How to Build Your First Linux Box
How to re-purpose recycled laptops to build your first bare metal Linux machine
Clarence Lam
CONTRIBUTOR

Building your own linux box has never been easier! What used to take hours or potentially days to configure can now be done even more easily on a Linux system than on a macOS or Windows system. There are many reasons why one has chosen to try a Linux system which can range from curiosity to even a new experience. For the purpose of this how-to, we will focus on re-purposing an old machine to be utilised for building your first Linux desktop system bare metal. This means running your entire operating system directly on the physical hardware rather than other methods like virtualisation (virtual machines) and dual-booting (multiple operating systems on a single machine).
Remember to ensure that all data on this old machine has been backed up because the process could potentially be irreversible once your data is wiped out! If you do not have a spare laptop, we highly recommend finding a second-hand laptop for just a few hundred dollars or even less as a machine to practise on rather than doing this on your main machine or attempting to dualboot it as a single mistake could result in complete data loss!
The best part about Linux systems is that you do not actually need a cutting edge machine for the purpose of running it bare metal.
Desired Specs
As mentioned, the most amazing thing about installing Linux is that you can grab an older computer that is too slow to even boot up or even a second hand machine and just install it. Unlike modern operating systems like Windows and macOS with minimum specifications, if a modern Linux distribution runs too slowly on your machine, you can always install an even more lightweight distribution or simply boot the entire operating system from just your thumbdrive!
Even though Linux can run on almost any hardware, some particular brands or models may be problematic and may involve more steps due to vendor lock-ins. It will be impossible to cover every single one of them in this article for the most part, but if you are planning to purchase a refurbished machine, we recommend the following brands for a more seamless experience:
- IBM or Lenovo Thinkpads (Most recommended due to the availability of parts)
- Framework (recently available in Singapore in April 2026)
- Dell
- HP
The following brands are generally less recommended due to potential issues given their proprietary hardware or vendor-locked issues preventing the ease of installation.The process of installing Linux is also more involved (not impossible) and we don’t recommend them if this is your first time installing Linux.
- Microsoft Surface line
- Acer Spin series
- Chromebooks
- Other 2-in-1s not mentioned in this article
- Intel Macs (feasible but more involved)
When it comes to refurbished laptops, it’s almost always a trade-off. You are swapping a lower price for older hardware, so the goal isn’t to find “the best laptop”, but the best one for what you want to use it for.
A few extra things worth checking before you buy:
- Processor (CPU): An Intel i5 (around 6th gen or newer) or a similar AMD chip is usually a safe bet.
- RAM: Refurbished laptops often come with the bare minimum. Check if the RAM can be upgraded, and aim for at least 8 GB if possible.
- Storage: An SSD makes everything feel noticeably faster and aim for at least 128GB
- Upgradability: Some laptops let you swap out RAM or storage easily, others don’t. This can make a big difference in how long the laptop stays useful. 8GB or more will be sufficient for most modern Linux distributions
- Ports: Make sure it has the ports you actually need. Older laptops often have more practical ports than newer models.
- Wi-Fi: Intel Wi-Fi cards tend to have fewer driver headaches
- Graphics: Integrated graphics usually work best with Linux but if you have a need for dedicated GPUs, there are GPU-friendly Linux distributions that we will cover in the distro section
- Warranty or return policy: Even a short warranty is better than none.
It also helps to ask the shop owner a few simple questions to avoid surprises later. Apart from the laptop’s history, you can ask what parts were replaced or repaired, whether the battery is original or replaced, and if any motherboard repair was done. Check if the RAM and storage can be upgraded, whether all ports are tested and working, and if the laptop comes with an operating system installed and activated. If you plan to install Linux, it’s also worth asking whether the BIOS or Secure Boot is locked, and what the warranty covers.
Buying in Singapore
In Singapore, refurbished laptops can often be found at neighbourhood laptop repair shops. If you’re looking for a wider selection, Sim Lim Square is a popular option, with many stores offering refurbished units. Prices typically start around the $500 range and can sometimes be even lower.
You can also find refurbished laptops online through marketplaces like Shopee, Lazada, and Amazon. These platforms sometimes offer laptops that are assembled or refurbished by third-party sellers and may not carry a well-known brand name. While these options can be more affordable, it’s especially important to check the specifications carefully, read reviews, and understand the warranty or return policy before buying.
If you’re based in the east, one shop I personally like to turn to is Dr. IT. They’re generally transparent about what they offer and are patient in answering questions, which makes the buying experience much less stressful.
Choosing Your First Distro
Unlike Windows or Mac, Linux has thousands of variants known as distributions (or distros). A catalog of active distros can be found on Distrowatch, but the sheer number can feel overwhelming for first-time users. The “best” distro is often a matter of preference and even philosophical in nature. For the purpose of this article, we will focus strictly on beginner-friendly Linux distributions that require minimal setup.
Most mainstream Linux distros trace their roots to 3 major upstream families which are Debian, Fedora, and Arch. You may have heard of infosec-focused distributions such as Kali and Parrot which fall under the Debian family as well as BlackArch which falls under the Arch family. Having familiarity within a Linux family will also allow you to switch to another distribution within the same family with greater ease due to the similarity of workflows within the CLI. For example, if you are already familiar with running Ubuntu, the move from Ubuntu to Kali will be quite seamless.
Each family follows a different philosophy around stability, frequency of update, and user control and the choice of your distro will be a matter of tradeoff. Generally, the more "stable" distros have a less frequent update cycle while the ones with a more frequent update cycle tend to have more parts "breaking" and customizability as a result.
Debian-based Distributions The Debian family is the oldest and most conservative of these 3 major families. Debian-based distributions prioritize stability. As such, many servers around the world run on Debian-based systems from Ubuntu Server to RHEL.
- Ubuntu:
- Mint
- Pop_OS!
Arch-based Distributions The Arch family is known for its rolling releases as well as its DIY and minimal philosophy. This means amongst the 3 major Linux families, Arch-based distros are the most flexible and modifiable and will suit those who enjoy tinkering their systems. However, they can also be the most intimidating of the 3 as they generally come unhardened out of the box unless you know what you are doing. As such, we generally do not recommend Arch-based systems as your first Linux desktop experience. However, if you are already comfortable with working in the terminal, and wish to dive deeper into understanding operating systems on a spare machine we will recommend the following:
- CachyOS
Fedora-based Distributions Fedora usually falls in the sweet spot between many Debian-based distributions (less frequent updates, less likely to break) and Arch-based distributions (frequent updates, more control, more likely to break).
- Fedora Workstation / KDE
- Bazzite (GPU works out of the box)
Installation Process
There are 3 primary steps to install a Linux distribution on a spare machine which are namely:
- Preparing your USB thumb drive with the Linux distro
- Booting into your USB thumb drive
- Configuring and installing your Linux distribution
Step 1: Preparing your USB thumb drive
You will also require the following 3 items:
- Your existing machine: (either Windows or macOS including Apple Silicon are fine) to download your Linux distro and prepare your USB thumbdrive
- The spare machine: The laptop you will install your Linux distribution bare metal
- USB Thumbdrive: 16GB or more. 8GB is fine but depending on your distro choice, some may require more than 8GB
Step 1: Prepare Thumb Drive and ISO file
Most Linux distributions include an ISO file, which is a digital copy of a CD-ROM or DVD. Instead of burning it into a disc media, we will write the installation file into a USB thumb drive. Your USB thumb drive should be large enough to store the ISO file. These generally range from 2GB to 10GB so a 16GB drive will be more than sufficient.
Download your chosen Linux distribution’s ISO file from the official website. Subsequently, you can also find the official links to your chosen distribution.
- Ubuntu: www.ubuntu.com
- Mint: www.linuxmint.com
- Pop_OS!: www.system76.com/pop
- CachyOS: www.cachyos.org
- Fedora Workstation: www.fedoraproject.org/workstation
- Bazzite: www.bazzite.gg
After downloading your ISO file, there are several ways you can write the installation file into your USB drive. We will cover the following 4 ways:
- GUI-based
- Rufus
- BalanaEtcher
- Fedora Media Writer
- CLI-based
- Terminal
- Powershell
Method 1: Rufus (Windows-only)
Rufus is a Windows-only application that allows you to create bootable USB drives.
- Launch "Rufus" and insert your USB drive
- Click on "Flash from file" and select that ISO file you have just downloaded
- Click on "SELECT" and choose your USB drive.
- Click "START" and the process will begin
- If prompted on the mode selection, select "Write in ISO mode (Recommended)"
Method 2: BalanaEtcher (macOS/Windows)
BalanaEtcher is a simpler cross-platform version of Rufus which allows for a straightforward drag-and-drop approach to creating a bootable USB drive.
- Launch "balanEtcher" and insert your USB drive
- Click on "Flash from file" and select that ISO file you have just downloaded
- Click on "Select target" and choose your USB drive
- Click "Flash" and wait for the process to begin and complete
Method 3: Fedora Media Writer (macOS/Windows)
Fedora also offers a cross-platform application for writing the ISO file onto your USB thumb drive. This can be downloaded on the same page as the installation file for the Fedora ISO and will work on any ISO file mentioned in this article. This is also the most straightforward method if you do not trust the other third-party apps given Red Hat's reputation.
- Launch "Fedora Media Writer"
- Click on "Select iso file" and "Next"
- On the next screen, click on "Select" to select the ISO file you have just downloaded and the directory of your USB drive
- Click "Write" and wait for the process to begin and complete
Method 4: Command Line (Advanced)
This is the most manual option if you do not wish to download any external application. You will use the "Terminal" on a macOS or "Powershell" on Windows. We only recommend this if you are already familiar with using the command line.
macOS (Terminal) or Windows Subsystem (WSL) for Linux:
diskutil list
You will see your USB drive if it is inserted, together with all other partitions on your machine.
WARNING: Make sure you find the correct drive directory as we will be wiping the disk. If you select the wrong disk (i.e. a partition on your machine containing your data and not the USB drive), you will lose everything! We will use /dev/sdb as the example and it may be a different name on your system so do check that you have the correct directory.
Unmount your USB drive with the following command and write the ISO where /path/to/your.iso is the path where your Linux ISO file is.
diskutil unmountDisk /dev/sdb
sudo dd if=/path/to/linux.iso of=/dev/sdb bs=4M status=progress
Windows (Powershell): The process is a little more involved and we will recommend one of the above app solutions if you are new to this or stick to using the method for WSL.
After inserting your USB drive, open PowerShell as Administrator and do the following:
diskpart
list disk
WARNING: Make sure you find the correct number as we will be wiping the disk. If you select the wrong disk (i.e. a partition on your machine containing your data and not the USB drive), you will lose everything!
select disk 1
clean
create partition primary
select partition 1
active
format fs=fat32 quick
assign
exit
Mount the ISO (Windows 10/11 can mount ISOs natively — just double-click it in Explorer, or via PowerShell):
powershellMount-DiskImage -ImagePath "C:\path\to\linux.iso"
Note the drive letter it mounts to (e.g., D:). Copy all files from ISO to USB:
cmdxcopy D:\* E:\ /E /H /F
Replace D: with your ISO drive letter and E: with your USB drive letter.
At this point, this should be sufficient for more modern systems. However, if the machine you are planning to install Linux on has a legacy BIOS (you will see issues with booting in Step 2), you may also run the following:
xcopy D:\* E:\ /E /F /H
Step 2: Booting from USB
- While the laptop (where you are installing Linux) is switched off, insert the USB thumb drive with your ISO file.
- Press the power button and hold or tap (repeatedly) the F10 or F12 key. On some models this may be the F1 key.
- You will enter the BIOS screen and see something like the following:
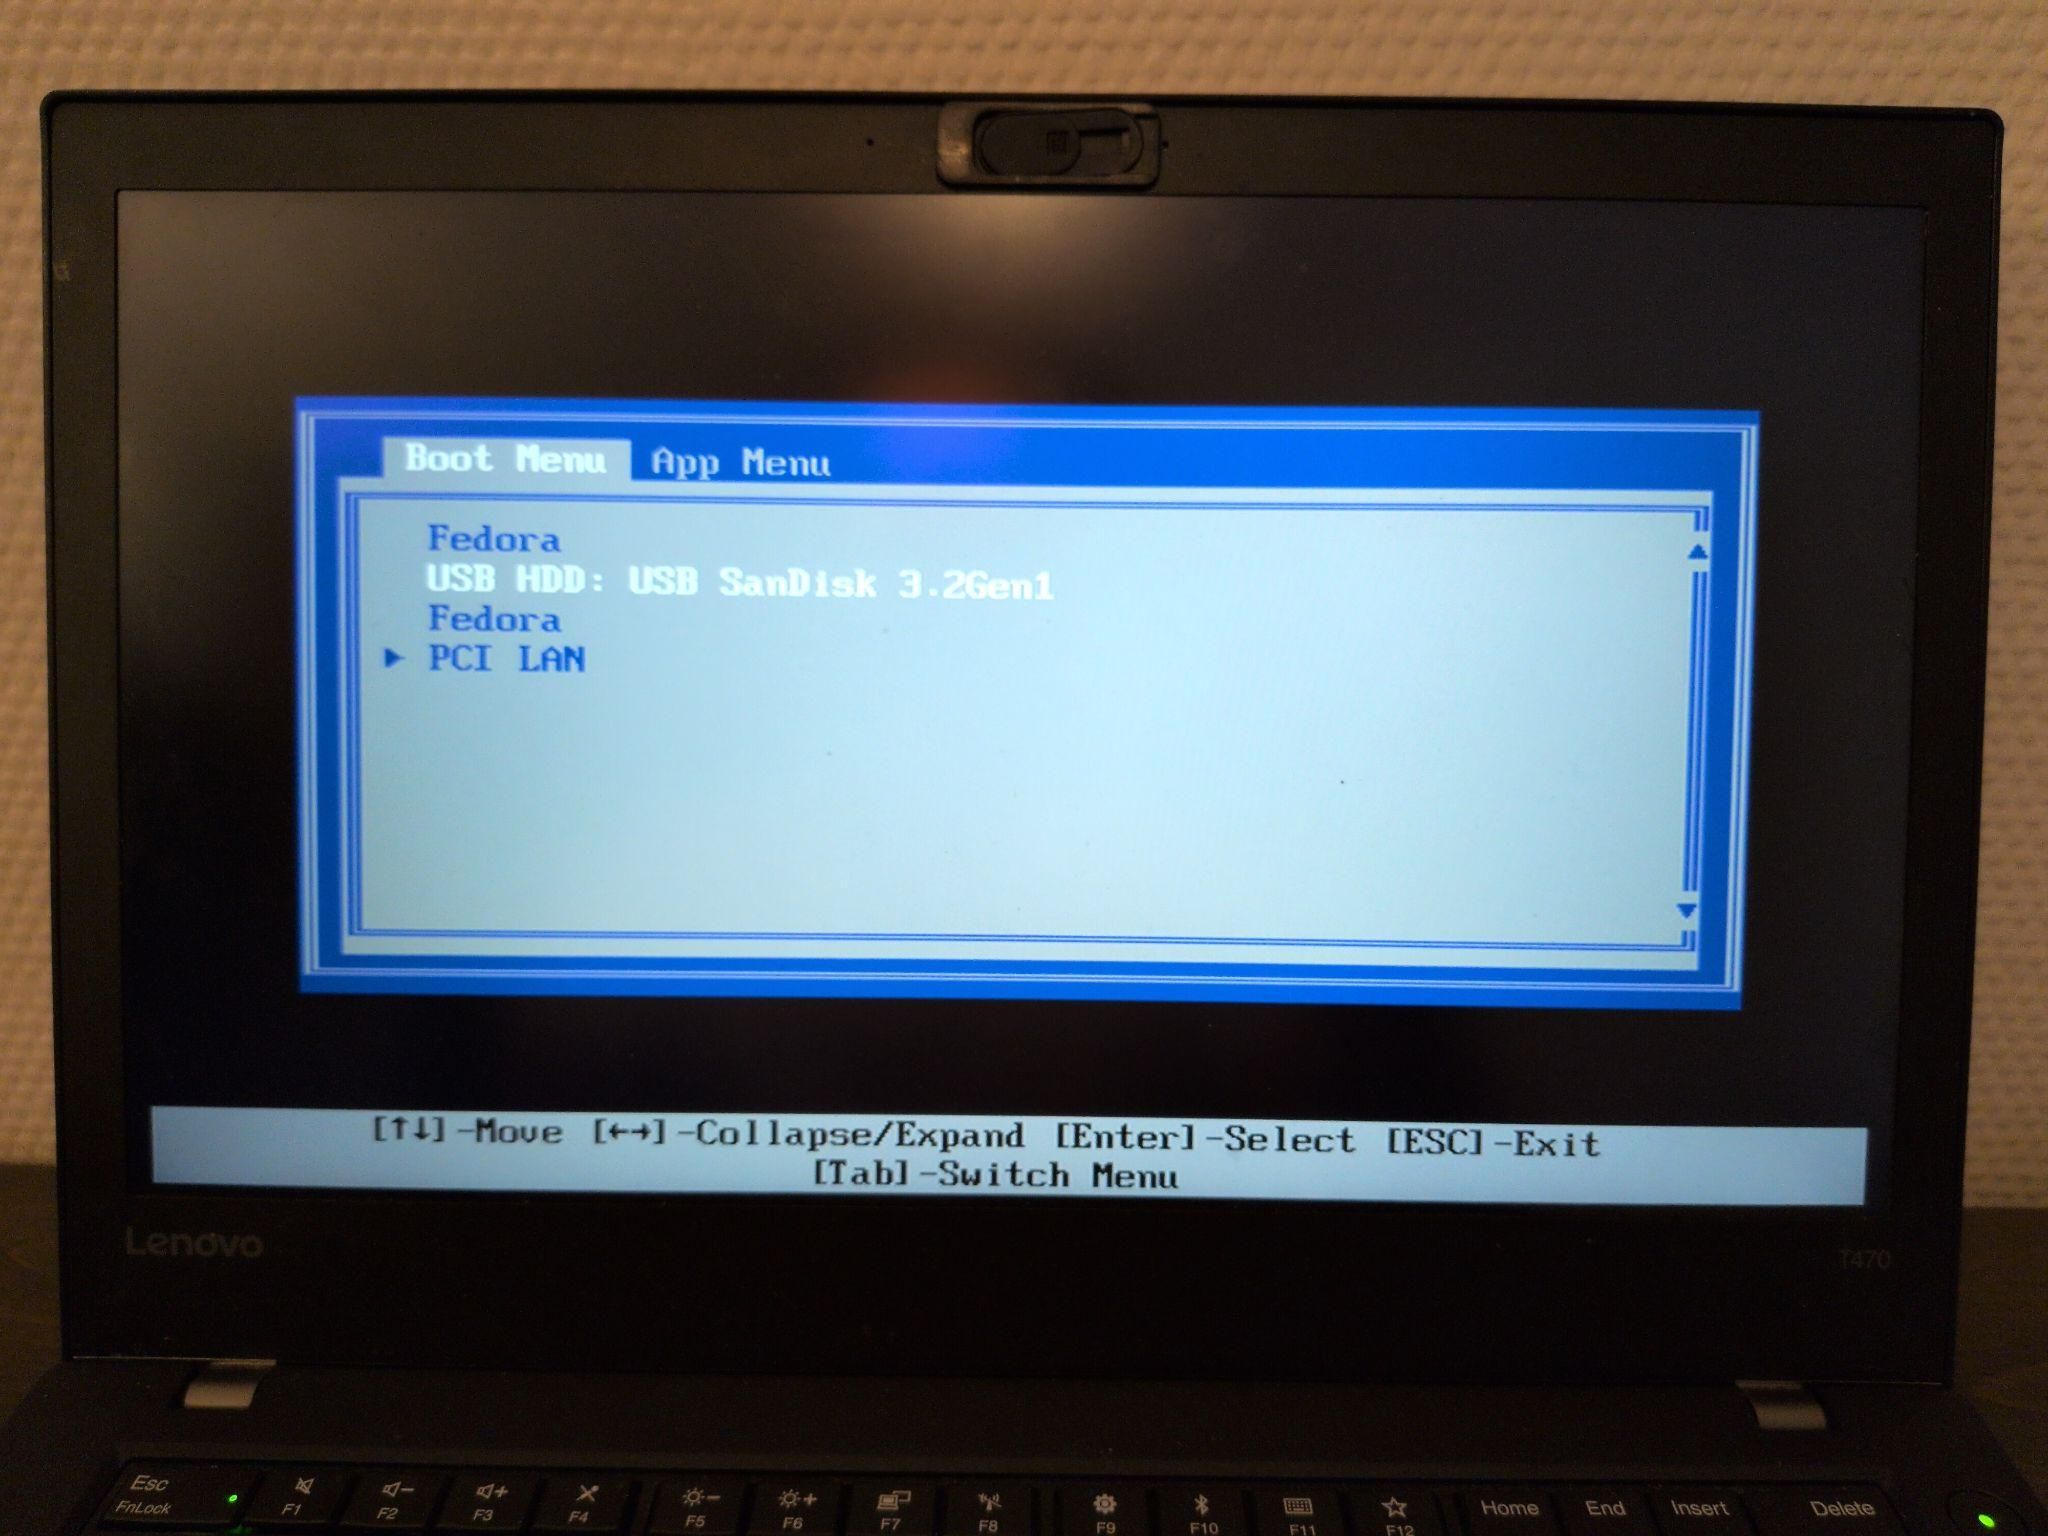
- Depending on the model and manufacturer, your experience here will differ slightly. You should look for a tab with one of the following names:
- Boot
- Boot Options
- Boot Priority
- Under one of these you will have to move your USB drive as the priority in the boot order. You may sometimes see the manufacturer name of your USB drive.
- When you are done, save and reboot.
- Upon restarting your computer, you should enter the bootloader menu that is text only (black screen white text with a few options to select including the name of your distribution). Select the first option and if all the steps are correct, you should see the logo of the distro you have picked at this point as your loading screen.
- If you are experiencing issues because of Secure Boot (some Linux distros support this whereas others do not), you will have to return to the BIOS and disable it.
Step 3: Running the Installer
Everything from this point is straightforward as the recommended distros come with a GUI installer. Most Linux (and even BSD) distros will generally follow this format (not always in this order) and it is even more straightforward in a GUI.
- Timezone
- Keyboard language and type: make sure you select the right one as this may cause issues with your password!)
- Partition: make sure you select the correct hard drive!
- Root account and password
Some distros also allow you to "test drive" them before installing it. This is to check for compatibility issues with various components such as your monitor, graphics card, wifi card, bluetooth, and serial ports and its compatibility with your various peripherals before installing. In these distros, there will be an installer icon in the desktop or in the menu bar.
Post-Installation
Congratulations! You have now successfully installed your first Linux distribution bare metal. Depending on your choice of distro you can update your OS in your GUI or in your CLI with the following command:
# For Debian-based distros
sudo apt update

# For Fedora-based distros
sudo dnf update

# For Arch-based distros
sudo pacman -Syu
Future app installations can now be done either through the GUI app store that comes with your respective installation or through the command line:
# For Debian-based distros
sudo apt install <package_name>

# For Fedora-based distros
sudo dnf install <package_name>

# For Arch-based distros
sudo pacman -S <package_name>
You can also change the desktop environment of your distro if you prefer a different user interface. Now that are confident with this entire process, you may also attempt to install infosec-focused distributions like Parrot or Kali, both of which are Debian-based.
If you are feeling adventurous, you may also attempt to try other Linux distributions, change the desktop environment of your current distro, or perhaps install Vanilla Arch with the CLI!